The Customer Master Listing is a detailed customer data listing that shows all the information that was entered in the Customer Maintenance module as well as a complete credit history. There are many options to customize this report that can make it a valuable tool for the sales and/or marketing department, such as only printing Customers with no activity after a specific date, and even only printing a listing of Customers entered in the system in a specified date range. In addition to customer data, this report also lists all “ShipTo” codes that have been created for a Customer; therefore, it can be a very lengthy report if you print for several Builder and/or Property Management customers. Also, this report can be exported to Excel, which means that Email addresses are included in the export, allowing you to create mass email listings.
Attached is an example of the data that exports to Excel. Below and attached are instructions on how to print the report.
The Customer Master Listing is a detailed customer data listing that shows all the information that was entered in the Customer Maintenance module as well as a complete credit history. There are many options to customize this report that can make it a valuable tool for the sales and/or marketing department, such as only printing Customers with no activity after a specific date, and even only printing a listing of Customers entered in the system in a specified date range. In addition to customer data, this report also lists all “ShipTo” codes that have been created for a Customer; therefore, it can be a very lengthy report if you print for several Builder and/or Property Management customers. Also, this report can be exported to Excel, which means that Email addresses are included in the export, allowing you to create mass email listings. Also, when exporting, the Statement default setting on the Customer’s account will export. You will see “O” for Open Items, “B” for Balance Forward, “N” for No Statement, and any other value defaults to Open Items. When you enter this report module, the screen will appear as follows:
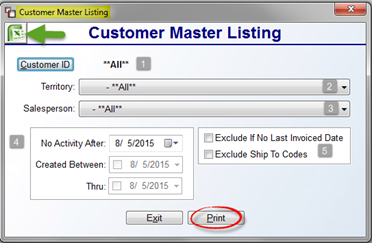
At the Customer ID (1) field, the system will default to **All** Customers. To print for a specific customer, click the Customer ID button to make a selection. At the Territory (2) field, use the drop-down arrow to print for specific Territory, or leave the default for **All** Territories. The Salesperson (3) field will also default to **All**. To print for a specific Salesperson, use the drop-down arrow to make a selection. In the box (4) at the bottom left, the No Activity After option will default to the current date. If you use the drop-down arrow to select a prior date, you can then use the Created Between & Thru date fields to exclude any customers created in the system within that date range. The box (5) to the right has two additional options. The Exclude If No Last Invoiced Date option, when checked, will exclude any Customers where there is no last invoiced date in the data record. The Exclude Ship To Codes, when checked, will exclude all Ship To Codes under each customer, which will make the export process faster. Also, when this option is checked, one additional Excel-only option will display as follows: Include Avg.Pay Days (Excel Only). This is also a very time-consuming export process, so it’s only available where the Exclude Ship To Codes is checked. When you have made your selections, click the Excel icon to export the data, or click the Print button to print to paper or screen.
Attached is an example of the data that exports to Excel. Below and attached are instructions on how to print the report.
The Customer Master Listing is a detailed customer data listing that shows all the information that was entered in the Customer Maintenance module as well as a complete credit history. There are many options to customize this report that can make it a valuable tool for the sales and/or marketing department, such as only printing Customers with no activity after a specific date, and even only printing a listing of Customers entered in the system in a specified date range. In addition to customer data, this report also lists all “ShipTo” codes that have been created for a Customer; therefore, it can be a very lengthy report if you print for several Builder and/or Property Management customers. Also, this report can be exported to Excel, which means that Email addresses are included in the export, allowing you to create mass email listings. Also, when exporting, the Statement default setting on the Customer’s account will export. You will see “O” for Open Items, “B” for Balance Forward, “N” for No Statement, and any other value defaults to Open Items. When you enter this report module, the screen will appear as follows:
At the Customer ID (1) field, the system will default to **All** Customers. To print for a specific customer, click the Customer ID button to make a selection. At the Territory (2) field, use the drop-down arrow to print for specific Territory, or leave the default for **All** Territories. The Salesperson (3) field will also default to **All**. To print for a specific Salesperson, use the drop-down arrow to make a selection. In the box (4) at the bottom left, the No Activity After option will default to the current date. If you use the drop-down arrow to select a prior date, you can then use the Created Between & Thru date fields to exclude any customers created in the system within that date range. The box (5) to the right has two additional options. The Exclude If No Last Invoiced Date option, when checked, will exclude any Customers where there is no last invoiced date in the data record. The Exclude Ship To Codes, when checked, will exclude all Ship To Codes under each customer, which will make the export process faster. Also, when this option is checked, one additional Excel-only option will display as follows: Include Avg.Pay Days (Excel Only). This is also a very time-consuming export process, so it’s only available where the Exclude Ship To Codes is checked. When you have made your selections, click the Excel icon to export the data, or click the Print button to print to paper or screen.